3D ROI Manager
This plugin allows to manage 3D ROI and perform various interactive measurements.
-
You can perform basic segmentation and labelling using 3D Segmentation button. Select low and high threshold for thresholding and labelling, if your image stack is already thresholded just use the default values.
-
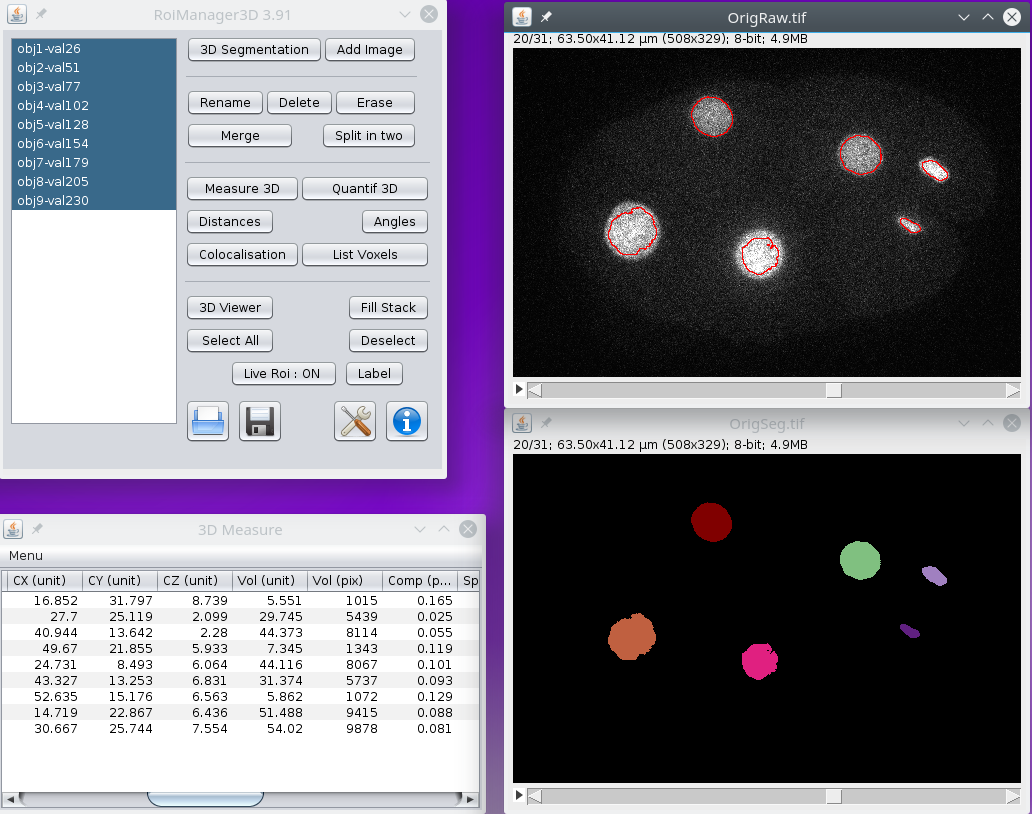
Once you have a labelled image, you can import it by adding the objects to the 3D Manager, by selecting the Add Image button. After a while, the list of objects is updated, and the default name will give information about their numbering in the list with obj and their id value in the labelled image with val.
-
Objects can be selected as usual by selecting them in the list, using Ctrl to add to the list ans Shift to select an interval.
-
Selected objects can be renamed using the Rename button, specify the prefix name, numbering will be added.
-
Selected objects can be removed from the list with the Delete button or erased from the current image with Erase.
-
Two or more objects can be merged into one object with the Merge button. The labelled image will not be updated and eventual separation between objects will not be filled.
-
One object can be split into two objects (see details in options) with the Split in two button. If the object is too compact it will not be split.
Various measurements can be performed, for batch processing you can use the plugin version that will perform measurements for all objects in a labelled image.
-
Geometrical and shape measurements for selected objects are performed using 3D Measure, see options to select the different measurements.
-
Intensity and counting measurements for selected objects using the current selected image are performed using Quantif 3D, see options to select the different measurements. In case the selected image is a labelled image (with different objects) the intensity measurement can be used to count the number of objects inside the selected objects in the 3D Manager.
-
Distances between two selected objects can be performed using Distances, see options to select the different measurements. It may take a while if many objects are selected, since all distances between all pairs will be computed.
-
Angles between 3 selected objects can be computed using Angles.
-
You can compute co-localisation volume between two objects using Colocalisation. It may take a while if many objects are selected, since all distances between all pairs will be computed. Contact surface between objects can be computed as well.
-
You can list the voxels beloging to selected objects with List Voxels.
Finally there are functions to visualise and select the 3D objects.
-
You can view the selected objects within 3D Viewer, first select the colour to draw your object with the color picker tool. The objects will be viewed as surface mesh.
-
You can draw the selected objects in the current stack with Fill Stack, the object will be drawn with foreground colour in the color picker tool. If the image stack is not RGB, the colour will be converted to grey.
-
You can select all the objects in the list, or deselect them. In case no objects are selected, most functions will process all objects.
-
You can overlay the objects contours in the current image setting Live Roi to ON. Overlays are computed for all selected objects for all slices, so it may take some time to compute, if the list of selected objects is updated, the overlays will be recomputed. You can change the mode of overlay (contour, centres, bounding box) in options.
-
You can add a label below the selected objects in the current image stack using Label. The label will be added in the slice corresponding to the centre of the object.
Some tools are provided to load/save the objects.
-
You can load a previously saved list of objects.
-
You can save the selected objects in a zip file.
-
You can access the different options about measurements and other functions.